As budget is a little tighter this year, due to being in school and the economy, I have decided to have a homemade Christmas. All my Christmas gifts this year will be homemade. I am really excited because I feel it is a part of sharing myself and my talents which will mean more to me, and hopefully to all the recipients. It cuts out a lot of the hustle and bustle and stress of Christmas shopping, and will help me focus more on the true meaning of Christmas.How to make a glass nativity:
what you need:
Pattern and tape
Contact Paper
Exacto Knife
Acid Etching
Brush
Water to rinse
Tape the pattern on the back and some contact paper on the front. With an exacto knife, cut out the pattern. Put the Acid Etching on and leave it for about 15 minutes. Since the contact paper is sticky and stuck to the glass it prevents the acid etch from spreading where it shouldn't. Rinse it with water, peel off the contact paper and pattern and you are done..well, then you have to cut the block, sand and paint it.
This was an easy project and I love it a lot. My mom is making a lot of these for Christmas gifts. Mom said I could make my own if I wanted to, and I did because I wanted to learn! I got to take it early because I want to display it this year and not have to wait till next.
*Here is a fun blog I am following that has a lot of great craft ideas. She is doing a 30 Days of a Homemade Christmas! If you are doing anything crafty for the holidays, let me know, I would love to see your ideas!
Sunday, November 16, 2008
Scrapbook Layouts
My brother just turned 8 and will be getting baptized next month. He had his birthday last week, so I made some layouts for him as part of his Christmas present. He won't appreciate them as much now, (that's why it is part of his present) but he will more when he is older.
Labels:
Paper Crafts,
Scrapbooking
Advent Calendar
A friend asked me if I had any ideas for making an advent calendar. Here are a few ideas I found...This is not my picture, but we had one exactly like this growing up that my mom made. In the numbers below are little ornaments. You take one out each day and hang it on the tree..you could also make little present boxes for the pockets to put under the tree.Here is ours for this year. Actually, I cheated and found this one at Target for $2.50. I love to craft, but when I can find it for cheaper than I can make it, I figure I might as well. It has a little candy cane hooked to a string that we will move each day as we get closer to Christmas. This would be and easy one to make.Her is one I found online. They covered matchboxes and in each is a little activity to do each day. Read the Christmas Story, go caroling, make gift tags, watch a Christmas movie as a family, make Christmas Cards to send out, etc..
And some more ideas with matchboxes.. make ornaments out of them, or you could stack them up and glue them together so they make drawers. Cover or paint them and use them for the same idea!
Labels:
Advent Calendars,
Christmas
I enjoy browsing other creative craft for ideas. Here is one I found. Little Birdie Secrets. I have made these bath bombs before, but I love the cupcake idea! They are so cute! The recipe I used is here, or you can visit her blog..the recipes are pretty much the same!Another really cute craft she has that I love is her fish-in-a-bag soaps! Simple, and so cute!
Labels:
Miscellaneous
Friday, November 14, 2008
Playdough
My son experienced playdough for the first time about a month ago in his little class at Church. A few weeks ago I decided to make some. I googled and found this great recipe! In the comments people were saying it only lasts for a week or so, then it becomes too sticky, but I have had mine for a month now and it is still in perfect shape, just follow the directions carefully and it will work.
A couple months ago I went to a craft fair and they had some cute little kid aprons with lots of pockets for cooking tools. I made one tonight using the leg of an old pair of jeans I had that had a hole in the knee. Not the greatest..I need a pattern before I make any more, but it works! And my son will keep his clothes clean! I love recycling!
Then I found this cute little baking set in the dollar bins at Target..it was $2.50, but sooo cute and the kids thought it was great. It comes with a rolling pin, spoon, a bunch of cookie cutters that are great -and wire whisk (which doesn't work too well for play dough, but the rest of it does!) My son and his little friends have had fun playing with it.
Labels:
Kids
Saturday, November 1, 2008
Enrichment - Nov 6
Here's what we'll be doing for the Get R' Done Enrichment Nov. 6th at my place. Blocks that say "Live, Laugh, Love", "Faith, Hope, Charity", " Sleep, Eat, Play" ..or whatever else you would like them to say. I'll get the wooden blocks and sand paper. They will be 6 inches long and I'll be charging $1.00 for 3 blocks plus paint and sandpaper and vinyl words... for any additional blocks, they will be $0.30 each. If you want a specific color of paint you can bring it with you otherwise, I have a few colors..I think they are about $0.48 or so at Wal-Mart for the small bottles of acrylic paint. I'll have the Cricut machine to cut out whatever words you are wanting, and I have Black, Brown, White, and Tan vinyl to cut from.. (so choose your paint color according to those colors for words). You will need to pick up your own ribbon, before or after you are done with the blocks..I got 1 spool of 2 inch wide ribbon with wire for $2.98 at Wal-Mart, it did all 3 blocks. I'm excited to do this project with you! Hope to see you there (hear)!
Belts
I love getting hand-me-downs for our son. Since clothes can be costly (especially on a student budget) we greatly appreciate, have, and continue to receive them from a few different neighbors (thank you), then we use and pass them on to someone else! At this age they grow out of clothes so quick that the clothes are usually still in great shape. Since he is between sizes right now, all of his pants are a little bit too big, but I don't want to buy any either because he already has so many. I have been looking everywhere for a belt that would fit my little guy (18 months) and finally decided to make some. Even if I had found ANY, they probably would have cost $8-$10. These were VERY inexpensive ($2 I think) and SO quick to make. Hooray! Now we can keep the pants up!
Hair Ties
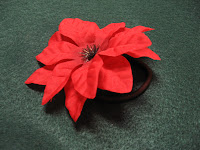
I wore one similar to these while I was on my mission. That was a while ago, but I loved it and have been wanting to make them for quite a while. I made a couple that will be great for the Christmas season and some others just for fun!
Trick-or-Treat!
Actually I made this last year. Sorry I didn't post it sooner, maybe you can use this idea next year! You have all seen them in the stores. Well, I don't remember where I got this idea or if I came up with it on my own, but I actually put my own hand inside the glove and when the kids reach in I grab their hands. I hide it for the smaller ones so I won't scare them too bad, but the older ones have really gotten a kick out of it. It's been a big hit for the last year two years!
I got the bowl from (where else but) Wal-Mart for 2 or 3$ and cut the bottom out of it and put a rubber cleaning glove up the bottom of it. I had to put some padding around the sharp plastic edge before I put the glove it, but then I just taped it all down (if you make this use black tape! I didn't and then had to spray paint it). I used a white glove because it looked better for Halloween than the yellow rubber cleaning glove would have. Hope you had a good Halloween too!
Labels:
Halloween
The Glass Block
Here's my glass block.. you've probably seen it before with this scene, but not w/the candy in it. I'm going to change the scene on it each month, or season or..whenever I decide, so I'm going to be posting on "The Glass Block" often. They are so fun and versatile. A great decoration for any room!
Subscribe to:
Posts (Atom)